服务端搭建OpenVPN服务
基本环境安装
1
2
3
4
5
6
| $ yum install https://dl.fedoraproject.org/pub/epel/epel-release-latest-8.noarch.rpm
$ yum install -y epel-release
$ yum update -y
$ yum install -y openssl lzo pam openssl-devel lzo-devel pam-devel
$ yum install -y easy-rsa
$ yum install -y openvpn
|
设置日志目录
1
2
| mkdir -p /var/log/openvpn/
chown openvpn:openvpn /var/log/openvpn
|
服务器证书生成
1
2
3
4
5
6
7
| cp -rf /usr/share/easy-rsa/3.0.8 /etc/openvpn/server/easy-rsa
cd /etc/openvpn/server/easy-rsa
./easyrsa init-pki
./easyrsa build-ca nopass
./easyrsa build-server-full server nopass
./easyrsa gen-dh
openvpn --genkey --secret ta.key
|
证书放置统一目录
1
2
3
4
5
6
| $ mkdir -p /etc/openvpn/server/certs
$ cp -a pki/ca.crt /etc/openvpn/server/certs
$ cp -a pki/private/server.key /etc/openvpn/server/certs
$ cp -a pki/issued/server.crt /etc/openvpn/server/certs
$ cp -a pki/dh.pem /etc/openvpn/server/certs
$ cp -a ta.key /etc/openvpn/server/certs
|
服务器openvpn基本配置
1
2
3
4
5
6
7
8
9
10
11
12
13
14
15
16
17
18
19
20
21
22
23
24
25
26
27
28
29
30
| $ vim /etc/openvpn/server/server.conf
port 1194
proto udp
dev tun
ca /etc/openvpn/server/certs/ca.crt
cert /etc/openvpn/server/certs/server.crt
key /etc/openvpn/server/certs/server.key
dh /etc/openvpn/server/certs/dh.pem
tls-auth /etc/openvpn/server/certs/ta.key 0
server 10.8.0.0 255.255.255.0
keepalive 10 120
comp-lzo
persist-key
persist-tun
user openvpn
group openvpn
log /var/log/openvpn/server.log
log-append /var/log/openvpn/server.log
status /var/log/openvpn/status.log
verb 3
explicit-exit-notify 1
max-clients 10
client-to-client
duplicate-cn
|
配置服务端路由
注意记得务配置中的监听端口记得放开!
1
2
3
4
5
6
7
| $ iptables -t nat -A POSTROUTING -s 10.8.0.0/24 -j MASQUERADE
$ iptables -vnL -t nat
$ vim /etc/sysctl.conf //打开路由转发
net.ipv4.ip_forward = 1
$ sysctl -p
|
启动openvpn
1
| $ openvpn --daemon --config /etc/openvpn/server/server.conf
|
客户端证书的创建(在服务端进行)
1)新建一个客户端模板
1
2
3
4
5
6
7
8
9
10
11
12
13
14
15
16
17
18
19
| $ vim /etc/openvpn/client/sample.ovpn
client
proto udp
dev tun
remote x.x.x.x 1194 //服务器公网ip和端口
route-nopull //指定ip段路由转发
route 10.8.0.0 255.255.255.0 vpn_gateway
route 172.16.0.0 255.255.255.192 vpn_gateway
ca ca.crt
cert admin.crt
key admin.key
tls-auth ta.key 1
remote-cert-tls server
persist-tun
persist-key
comp-lzo
verb 3
mute-replay-warnings
|
2)客户端证书生成脚本
1
2
3
4
5
6
7
8
9
10
11
12
13
14
15
16
17
18
19
20
21
22
23
24
25
26
27
28
29
30
| $ vim /etc/openvpn/client/open_user.sh
set -e
OVPN_USER_KEYS_DIR=/etc/openvpn/client/keys
EASY_RSA_VERSION=3
EASY_RSA_DIR=/etc/openvpn/server/easy-rsa/
PKI_DIR=$EASY_RSA_DIR/pki
for user in "$@"
do
if [ -d "$OVPN_USER_KEYS_DIR/$user" ]; then
rm -rf $OVPN_USER_KEYS_DIR/$user
rm -rf $PKI_DIR/reqs/$user.req
sed -i '/'"$user"'/d' $PKI_DIR/index.txt
fi
cd $EASY_RSA_DIR
./easyrsa build-client-full $user nopass
mkdir -p $OVPN_USER_KEYS_DIR/$user
cp $PKI_DIR/ca.crt $OVPN_USER_KEYS_DIR/$user/
cp $PKI_DIR/issued/$user.crt $OVPN_USER_KEYS_DIR/$user/
cp $PKI_DIR/private/$user.key $OVPN_USER_KEYS_DIR/$user/
cp /etc/openvpn/client/sample.ovpn $OVPN_USER_KEYS_DIR/$user/$user.ovpn
sed -i 's/admin/'"$user"'/g' $OVPN_USER_KEYS_DIR/$user/$user.ovpn
cp /etc/openvpn/server/certs/ta.key $OVPN_USER_KEYS_DIR/$user/ta.key
cd $OVPN_USER_KEYS_DIR
zip -r $user.zip $user
done
exit 0
|
3)生成客户端证书
生成的证书在此处配置位于 /etc/openvpn/client/keys 目录下。
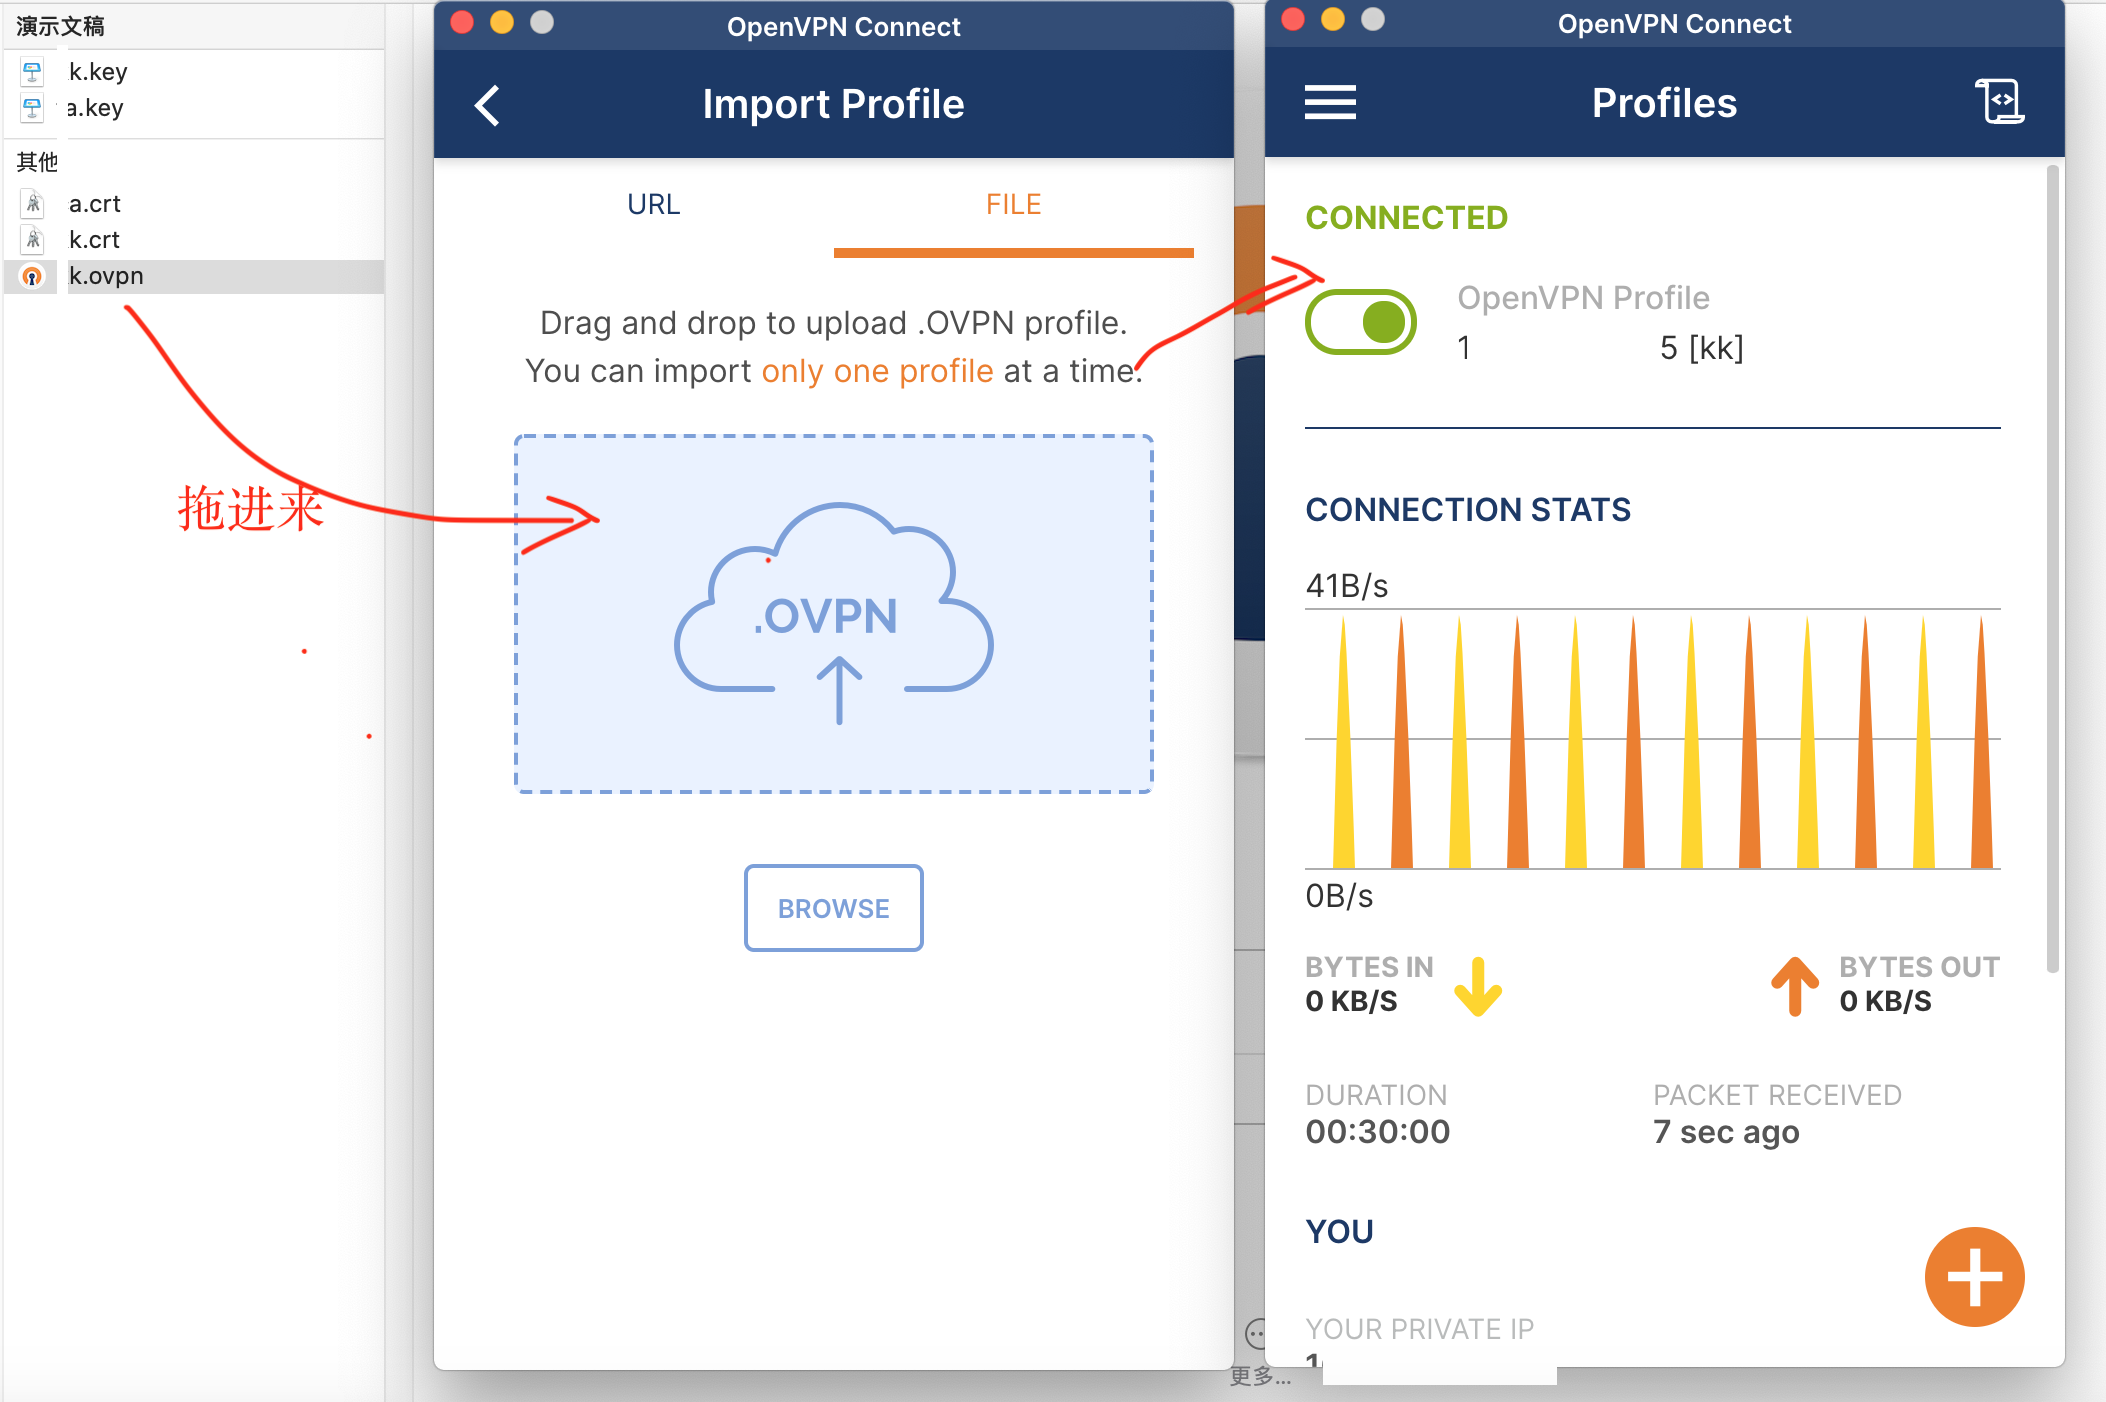
客户端连接OpenVPN服务
以 Mac 为例。
客户端下载地址:https://openvpn.net/client-connect-vpn-for-mac-os/
客户端使用说明:地址
下面进行简要说明:
1)从服务端下载生成的客户端证书文件压缩包 xxx.zip
2)打开OpenVPN客户端,并导入 xxx.ovpn 即可连接服务端openvpn。
上述步骤完成后,即建立了本地和远端的安全通信隧道。无论从本地访问远端,还是从远端访问本地,就好像处在同一个局域网中一样丝滑。
使用squid服务器实现代理访问
Squid(Squid cache,简称Squid)是Linux系统中最常用的一款老牌开源代理服务软件,可以很好地实现HTTP和FTP,以及DNS查询、SSL等应用的缓存代理,功能十分强大。官方网站为 http://www.squid-cache.org 。
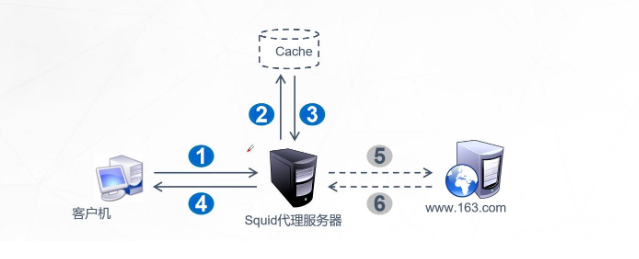
使用代理可以提高Web访问速度,并且可以隐藏客户机的真实IP地址。
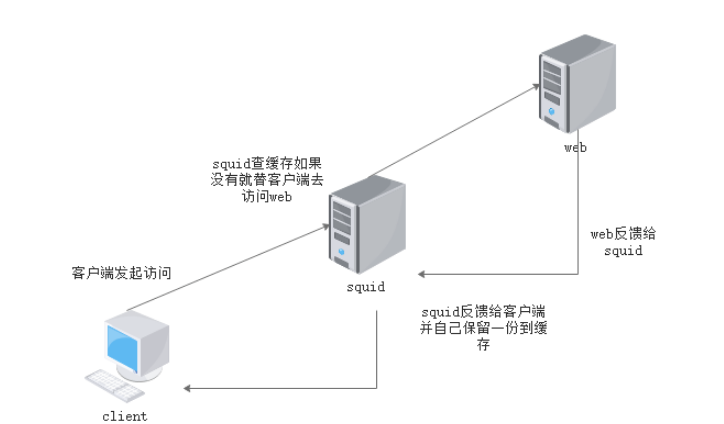
如果你想在你的机器上网,并且想要使用另一台机器的网络,下面让我们看看怎么实现吧。
安装和测试
下面是安装squid步骤:
1
2
3
4
5
| yum update
yum install squid
apt-get update
apt-get install squid
|
安装完成后编辑squid的配置文件:
1
2
3
4
5
| vim /etc/squid/squid.conf
http_port 23344
http_access allow all
cache_mem 60 MB
|
生成Swap:
1
2
| cd /usr/sbin/
./squid -z
|
重载配置,使配置生效:
1
2
3
4
5
6
7
8
9
10
11
|
squid reload
squid start
squid stop
squid -f /etc/squid/squid.conf
squid -k reconfigure
squid -k shutdown
squid -k restart
squid -k parse
|
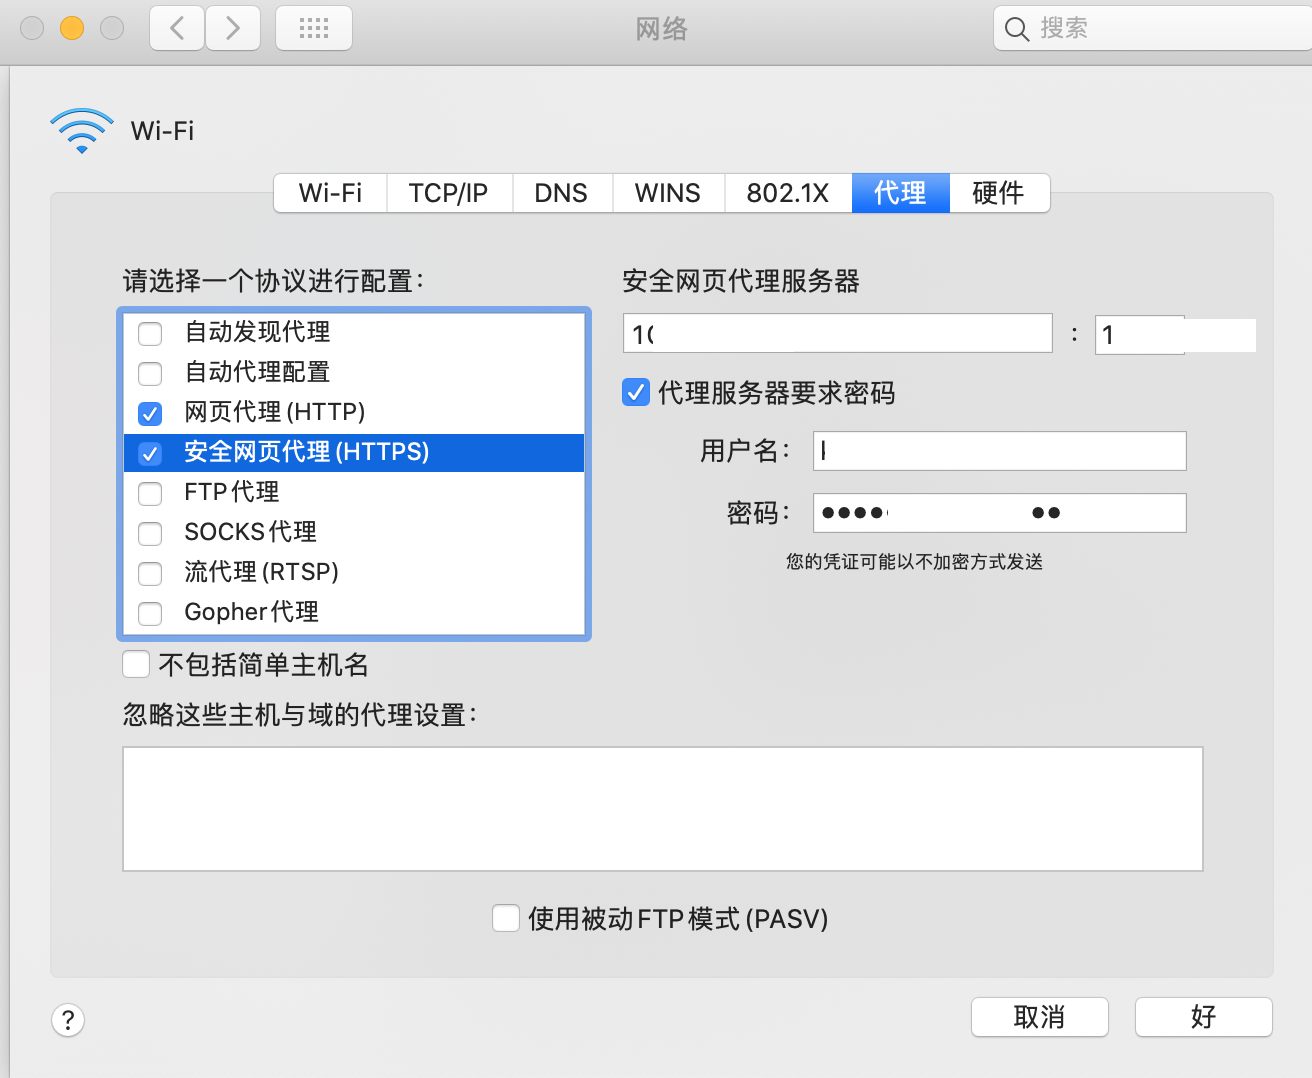
在客户端测试:
1
2
3
4
5
6
7
8
9
10
11
12
13
|
export http_proxy=http://xxx.xxx.xxx.xxxx:23344
export https_proxy=http://xxx.xxx.xxx.xxxx:23344
set http_proxy=http://xxx.xxx.xxx.xxxx:23344
set https_proxy=http://xxx.xxx.xxx.xxxx:23344
tail -f /var/log/squid/access.log
curl -l "https://www.keyllo.com"
|
配置密码
这里使用最简单的密码验证 basic_ncsa_auth。
安装生成密码工具:
1
2
| yum install httpd-tools
apt install apache2-utils
|
使用命令生成用户名和密码:
1
2
3
| htpasswd -h
htpasswd -c /etc/squid/passwd xxx_user
htpasswd -b -c /etc/squid/passwd xxx_user xxx_pass
|
然后squid的配置文件(squid.conf)最上方 添加如下内容(注意位置,通常设置了密码登录不生效都是配置位置的原因):
1
2
3
4
5
6
7
| auth_param basic program /usr/lib64/squid/basic_ncsa_auth /etc/squid/passwd
auth_param basic children 5
auth_param basic realm Proxy Authentication Required
auth_param basic credentialsttl 2 hours
auth_param basic casesensitive off
acl auth_users proxy_auth xxx_user
http_access allow auth_users
|
完成配置后,保存文件并重新启动Squid。
作为上面所述行的简要概述:
- 第一行告诉Squid使用帮手程序,并在文件中查找用户名和密码。
- 该线指定了生成Squid身份验证器过程的最大数量。
auth_param basic children 5
auth_param basic realm指定要向客户报告身份验证方案的保护范围。auth_param basic credentialsttl 2 hours指定Squid假定外部验证的用户名有多长:密码对适用于auth_param basic casesensitive off指定用户名是否对案例敏感。acl auth_users proxy_auth amos john为允许身份验证的用户定义Squid身份验证 ACL。
完成配置后,保存文件并重新启动Squid。
/usr/lib64/squid/basic_ncsa_auth、/etc/squid/passwd替换你本地实际的路径。这里需要注意,如果你想只允许有效,那么就要把之前配置的http_access allow all`注释掉,否则不使用用户名和密码也可以使用代理。
验证密码
客户端如果配置了代理访问,从客户端看,如果你尝试通过浏览器访问互联网,将提示您进行身份验证。当输入正确身份验证时,您将能够在浏览器上访问互联网。
如果您尝试使用wget下载文件,将提示您进行身份验证:
1
2
3
4
5
| wget google.com
--2022-01-19 01:11:21-- http://google.com/
Connecting to 192.168.xx.xx:23344... connected.
Proxy request sent, awaiting response... 407 Proxy Authentication Required
2022-01-19 01:11:21 ERROR 407: Proxy Authentication Required.
|
因此:
1
| wget --proxy-user=xxx_user --proxy-password=xxx_pass google.com
|
设置为高匿代理
代理IP是一种常见的换IP工具,方便且实用。通过使用代理IP,我们可以实现用新的IP来代替自己原来的IP访问目标端。代理IP有多种类型,其中按匿名程度可分为三种:透明代理,普匿代理(普通匿名代理)和高匿代理(高级匿名代理)。这三种类型的代理其实非常好区分,从字面上就很容易理解。在使用了代理IP访问目标端之后,如果被访问端知道了来访者使用了代理IP,并且识别出来访者的具体IP,那么这就是透明代理;如果被访问端知道了来访者使用了代理IP,但是无法识别出来访者的具体IP,那么这就是普匿代理;如果被访问端无法识别出来访者是否使用了代理IP,并且无法识别出来访者的具体IP,那么这就是高匿代理。
高匿代理对来访者进行了很好的伪装,用一个随机的IP代替原来的IP,并且隐藏了使用代理的信息,目标端只对其当做一个普通的来访者来对待,隐匿度最高,所以叫“高匿代理”。
这三种代理虽然匿名程度不同,但是都有其适用的范围,我们可以根据自己的实际情况进行选择和使用。其中高匿代理的适用范围最广,例如网络爬虫,都是配合使用高匿代理才能保证工作效率。
Squid高匿代理的配置,只需要在配置文件的最下方添加如下内容即可:
1
2
3
4
5
| vim /etc/squid/squid.conf
request_header_access Via deny all
request_header_access X-Forwarded-For deny all
request_header_access From deny all
|
Squid关闭缓存
1
2
3
4
5
6
7
8
9
10
11
12
13
14
15
16
17
18
19
20
| acl NCACHE method GET
no_cache deny NCACHE
acl NCACHE2 method POST
no_cache deny NCACHE2
acl NCACHE3 method PUT
no_cache deny NCACHE3
acl NCACHE4 method DELETE
no_cache deny NCACHE4
acl NCACHE5 method HEAD
no_cache deny NCACHE5
acl NCACHE6 method OPTIONS
no_cache deny NCACHE6
acl NCACHE7 method TRACE
no_cache deny NCACHE7
|
重新启动
1
2
3
4
5
6
7
|
squid -k parse
squid reload
squid stop
squid start
|