NIO 简介
NIO是什么?
- new IO或non blocking IO,java 1.4开始引入(JDK1.7+中的NIO统称为NIO.2)可以替代标准的java io api;
- 与原来的io有着相同的作用和目的,但使用方式完全不同,
NOI面向缓冲区、是基于通道的IO操作,文件的读写更加高效。
与传统IO有什么区别?
| IO |
NIO |
| 面向流(Stream Oriented) |
面向缓冲区(Buffer Oriented) |
| 阻塞IO(Blocking IO) |
非阻塞式IO(Non Blocking IO) |
| (无) |
选择器(Selectors) |
啥是通道、缓冲区?
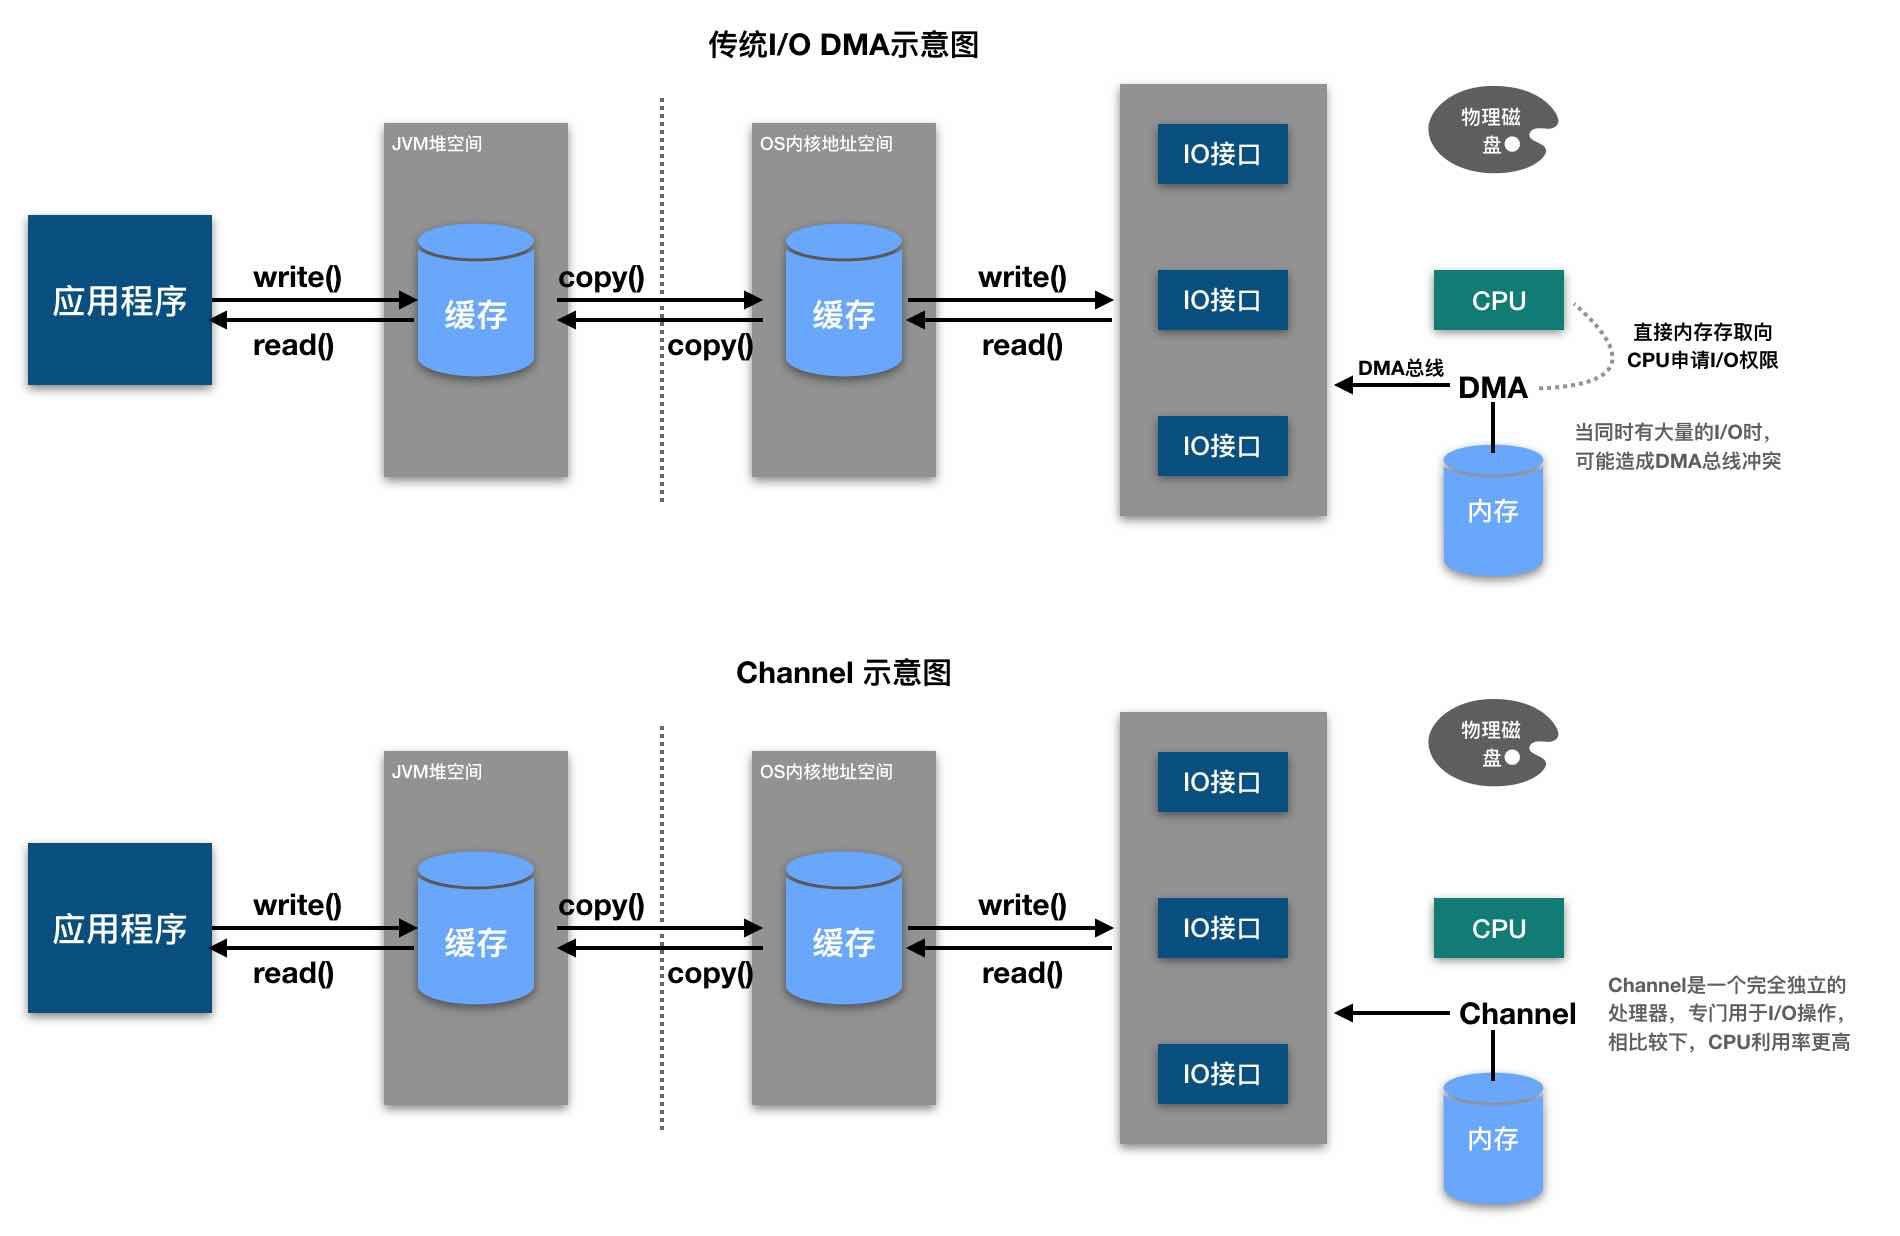
NIO的核心在于通道(channel)和缓冲区(buffer)。通道表示打开到IO设备(例如文件、套接字)的连接,若需要NIO系统,需要获取用于连接IO系统设备的通道以及用于容纳数据的缓冲区,然后操作缓冲区,对数据进行处理。简而言之,channel负责搭建传输通道,buffer负责数据的存取。示意图如下:

缓冲区(buffer)
buffer的分类和基本方法
缓冲区实际上是一个数组,专门用于存取不同类型的数据。根据数据类型的不同(boolean类型除外),NIO提供了相应类型的缓冲区。
- ByteBuffer
- ShortBuffer
- IntBuffer
- LongBuffer
- DubbleBuffer
- FloatBuffer
- CharBuffer
最常用的是ByteBuffer。上述缓冲区的管理方式几乎一致,都是通过allocate()获取缓冲区。缓冲区存取数据的两个核心方法:
put 存入数据到buffer中get 获取buffer中的数据
要想对缓冲区的数据进行正确的存取,必须先要熟悉buffer缓冲区的几个核心属性,如下:
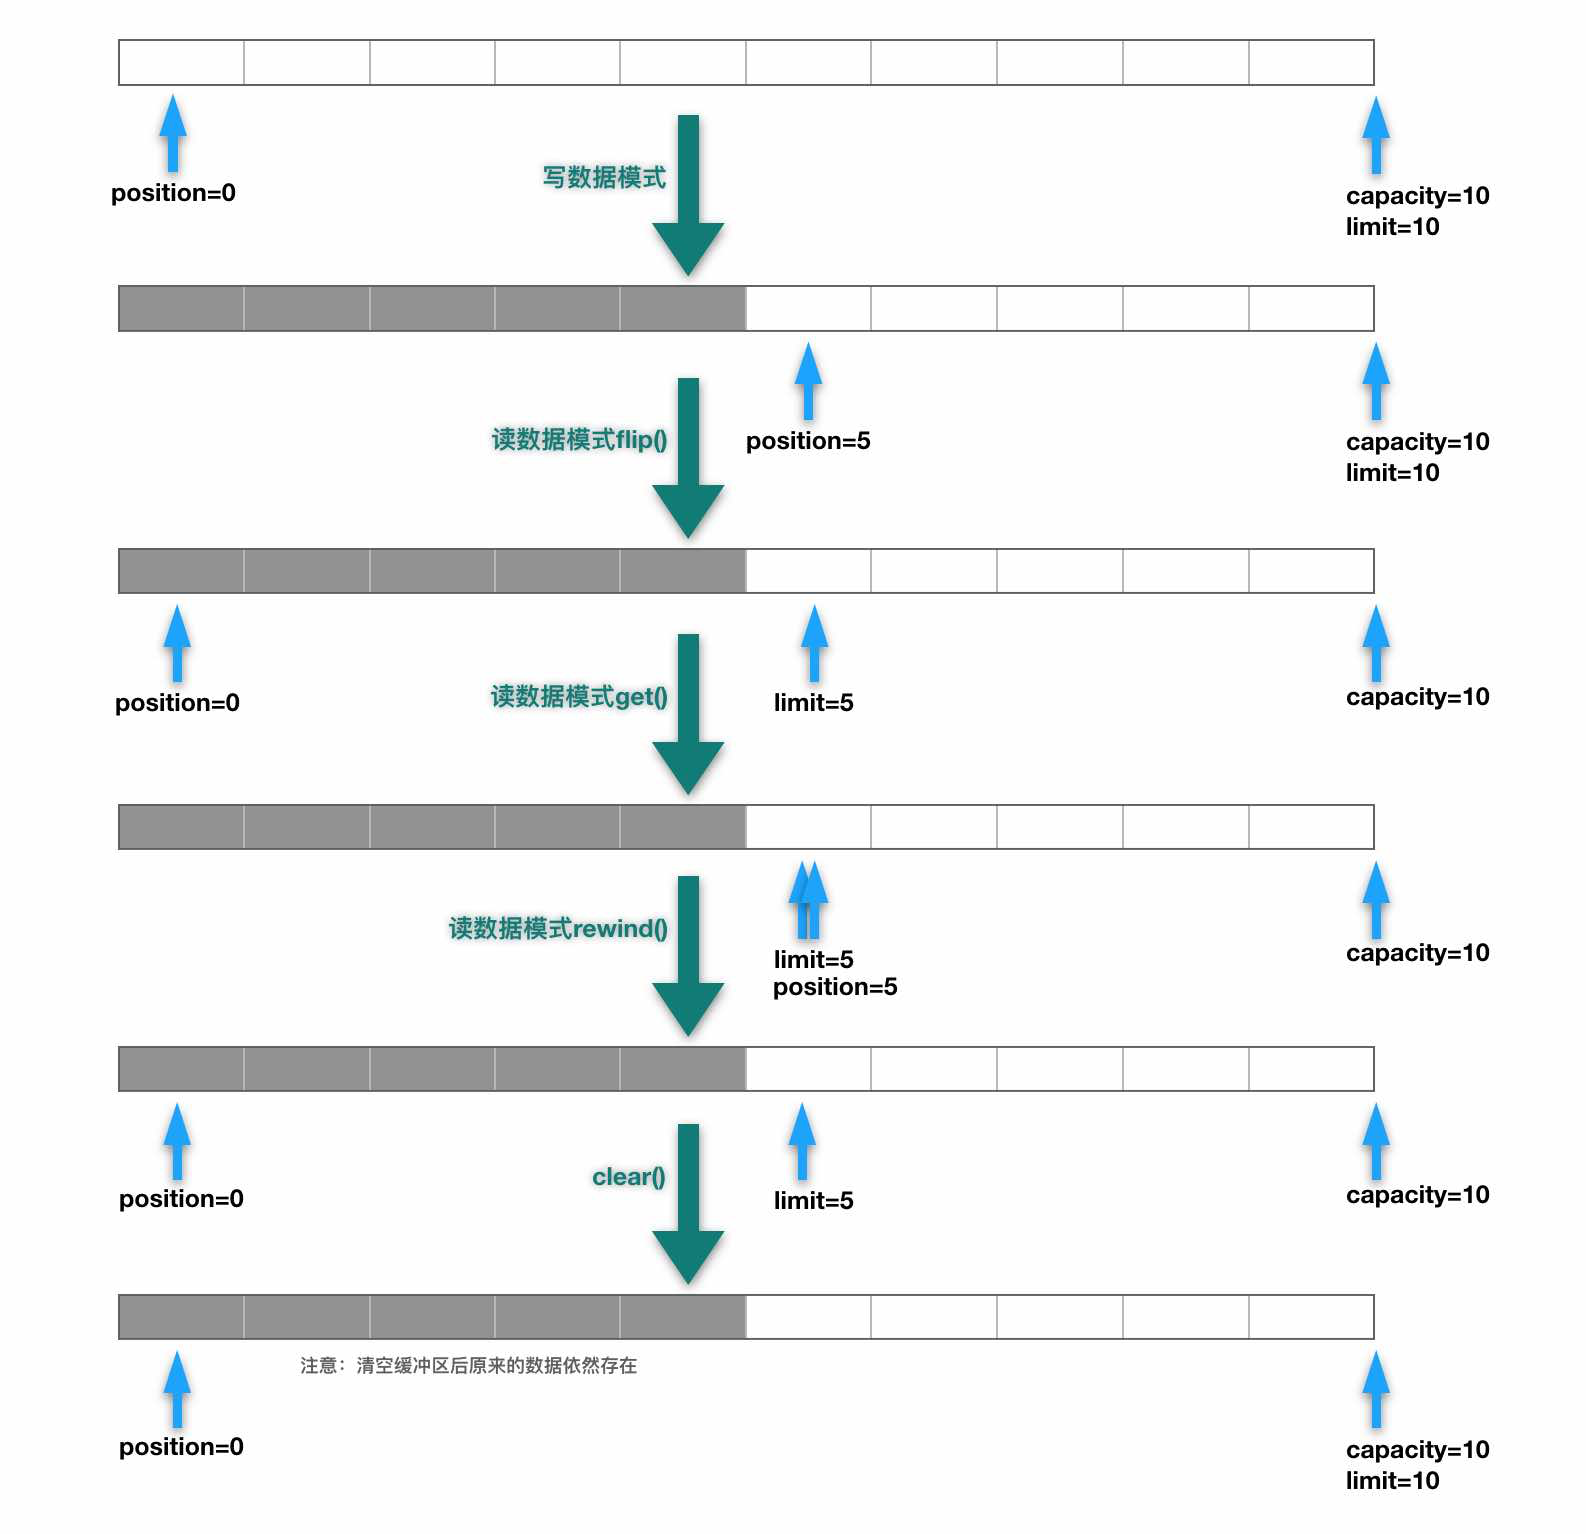
capacity 表示缓冲区中最大存储数据的容量,一旦声明不能改变;
limit 表示缓冲区中可以操作数据的容量大小(limit后面的数据不能进行读写,默认初始大小与capacity相等);
position 表示缓冲区中正在操作数据的位置
mark 表示通过mark方法标记的当前position的位置,可以通过reset方法重置buffer的position到mark的位置。
综上可以看出 0 <= mark <= position <= limit <= capacity。
请看如下简单的测试方法:
1
2
3
4
5
6
7
8
9
10
11
12
13
14
15
16
17
18
19
20
21
22
23
24
25
26
27
28
29
30
31
32
33
34
35
36
37
38
39
40
41
42
43
44
45
|
@Test
public void test01() {
ByteBuffer buffer = ByteBuffer.allocate(10);
System.out.println(buffer.position());
System.out.println(buffer.limit());
System.out.println(buffer.capacity());
String str = "abcde";
buffer.put(str.getBytes());
System.out.println(buffer.position());
System.out.println(buffer.limit());
System.out.println(buffer.capacity());
buffer.flip();
System.out.println(buffer.position());
System.out.println(buffer.limit());
System.out.println(buffer.capacity());
byte[] bs = new byte[buffer.limit()];
ByteBuffer buffer2 = buffer.get(bs);
System.out.println(new String(bs));
System.out.println(buffer2==buffer);
System.out.println(buffer.position());
System.out.println(buffer.limit());
System.out.println(buffer.capacity());
buffer.rewind();
System.out.println(buffer.position());
System.out.println(buffer.limit());
System.out.println(buffer.capacity());
buffer.clear();
System.out.println(buffer.position());
System.out.println(buffer.limit());
System.out.println(buffer.capacity());
}
|
演示图如下:

测试mark和reset方法:
1
2
3
4
5
6
7
8
9
10
11
12
13
14
15
16
17
18
19
20
21
22
23
24
25
26
27
28
29
30
31
32
33
34
35
36
37
38
39
40
|
@Test
public void test2() {
ByteBuffer buffer = ByteBuffer.allocate(10);
System.out.println(buffer.position());
System.out.println(buffer.limit());
System.out.println(buffer.capacity());
String str = "abcde";
buffer.put(str.getBytes());
System.out.println(buffer.position());
System.out.println(buffer.limit());
System.out.println(buffer.capacity());
buffer.flip();
byte[] bs = new byte[buffer.limit()];
buffer.get(bs, 0, 2);
System.out.println(new String(bs, 0, 2));
System.out.println(buffer.position());
buffer.mark();
buffer.get(bs, 2, 2);
System.out.println(new String(bs, 2, 2));
System.out.println(buffer.position());
buffer.reset();
System.out.println(buffer.position());
if (buffer.hasRemaining()) {
System.out.println(buffer.remaining());
}
}
|
直接缓冲区和非直接缓冲区
- 非直接缓冲区:通过
allocate()方法分配的缓冲区,将缓冲区建立在JVM的内存中,传统I/O操作使用的缓冲区以及通过allocate()创建的缓冲区都属于非直接缓冲区;
- 直接缓冲区:通过
allocateDirect()方法分配的缓冲区,将缓冲区建立在操作系统的物理内存中,直接缓冲区方式通过在物理内存中创建映射文件减少了中间的copy步骤,因而I/O效率较高,但同时也增加了应用程序的不稳定性;
- 创建直接缓冲区的消耗要大于非直接缓冲区,直接缓冲区的内容可以驻留在常规的垃圾回收堆外(不受JVM控制,而是受控于操作系统),因此它们对应用程序的内存造成的影响不明显,故建议将直接缓冲区分配给那些易受基础系统的本机I/O操作影响的大型、持久的缓冲区;一般情况下,最好仅在直接缓冲区能在程序性能方面带来明显好处时分配它们;
直接[字节]缓冲区(注意只是字节缓冲区)还可以通过FileChannel.map() 方法将文件区域直接映射到内存中来创建,该方法返回 MappedByteBuffer。Java平台的实现有助于通过JNI从本机代码创建直接字节缓冲区。如果以上这些缓冲区中的某个缓冲区实例指的是不可访问的区域,则试图访问该区域不会更改缓冲区的内容,并且将会在访问期间或稍后的某个时间导致抛出不确定的异常;- 字节缓冲区是直接还是非直接缓冲区,可以通过调用
isDirect() 方法来确定,以便在性能关键性代码中执行显示的缓冲区管理;

简单测试及源码:
1
2
3
4
5
6
7
8
9
10
11
12
13
14
15
16
17
18
19
20
21
22
23
24
25
26
27
28
29
30
31
32
33
34
35
36
37
38
39
40
41
42
43
| @Test
public void test03() {
ByteBuffer buffer1 = ByteBuffer.allocate(10);
System.out.println(buffer1.isDirect());
ByteBuffer buffer2 = ByteBuffer.allocateDirect(10);
System.out.println(buffer2.isDirect());
}
public static ByteBuffer allocate(int capacity) {
if (capacity < 0)
throw new IllegalArgumentException();
return new HeapByteBuffer(capacity, capacity);
}
public static ByteBuffer allocateDirect(int capacity) {
return new DirectByteBuffer(capacity);
}
DirectByteBuffer(int cap) {
super(-1, 0, cap, cap);
boolean pa = VM.isDirectMemoryPageAligned();
int ps = Bits.pageSize();
long size = Math.max(1L, (long)cap + (pa ? ps : 0));
Bits.reserveMemory(size, cap);
long base = 0;
try {
base = unsafe.allocateMemory(size);
} catch (OutOfMemoryError x) {
Bits.unreserveMemory(size, cap);
throw x;
}
unsafe.setMemory(base, size, (byte) 0);
if (pa && (base % ps != 0)) {
address = base + ps - (base & (ps - 1));
} else {
address = base;
}
cleaner = Cleaner.create(this, new Deallocator(base, size, cap));
att = null;
}
|
通道(channel)
啥是通道?
Channel接口是由java.nio.channels包定义的,表示IO源与目标打开的连接,Channel类似于传统的“流”,只不过Channel本身不能直接访问数据,而只能与Buffer进行交互(可以将channel想象成火车道,而把buffer想象成装载数据的火车)。

通道咋用?
Channel接口的主要实现类:
FileChannel 本地文件传输通道SocketChannel/ServerSocketChannel TCP协议数据传输通道DatagramChannel UDP协议传输通道
获取通道的三种方式:
- Java针对支持通道的类提供了
getChannel() 方法来获取通道,这些类有 FileInputStream、FileOutputStream、RandomAccessFile、Socket、ServerSocket、DatagramSocket等;
- NIO.2(JDK1.7+)可以通过各个通道的实现类提供的静态方法
open() 来获取通道;
- NIO.2(JDK1.7+)也可以通过
Files.newByteChannel 方法来获取通道;
使用 channel通道+非直接缓冲区 完成文件的复制:
1
2
3
4
5
6
7
8
9
10
11
12
13
14
15
16
17
18
19
20
21
22
23
24
25
26
27
28
29
30
31
32
33
34
35
36
37
38
39
40
41
| @Test
public void test01() {
FileInputStream fis = null;
FileOutputStream fos = null;
FileChannel fisChannel = null;
FileChannel fosChannel = null;
try {
fis = new FileInputStream("1.jpg");
fos = new FileOutputStream("2.jpg");
fisChannel = fis.getChannel();
fosChannel = fos.getChannel();
ByteBuffer buffer = ByteBuffer.allocate(1024);
while (fisChannel.read(buffer) != -1) {
buffer.flip();
fosChannel.write(buffer);
buffer.clear();
}
} catch (IOException e) {
e.printStackTrace();
} finally {
if (fosChannel != null) {
try { fosChannel.close(); } catch (IOException e) { e.printStackTrace(); }
}
if (fisChannel != null) {
try { fisChannel.close(); } catch (IOException e) { e.printStackTrace(); }
}
if (fos != null) {
try { fos.close(); } catch (IOException e) { e.printStackTrace(); }
}
if (fis != null) {
try { fis.close(); } catch (IOException e) { e.printStackTrace(); }
}
}
}
|
使用 channel+直接缓冲区(物理内存映射文件) 完成文件的复制:
1
2
3
4
5
6
7
8
9
10
11
12
13
14
15
16
17
18
19
20
21
22
23
24
25
26
27
28
29
30
31
| @Test
public void test02() throws IOException {
Instant startTime = Instant.now();
FileChannel finChannel = FileChannel.open(Paths.get("xxx/ubuntu1604.iso"),
StandardOpenOption.READ);
FileChannel foutChannel = FileChannel.open(Paths.get("xxx/ubuntu5.iso"),
StandardOpenOption.READ, StandardOpenOption.WRITE, StandardOpenOption.CREATE);
MappedByteBuffer inMappedBuffer = finChannel.map(MapMode.READ_ONLY, 0, finChannel.size());
MappedByteBuffer outMappedBuffer = foutChannel.map(MapMode.READ_WRITE, 0, finChannel.size());
byte[] bs = new byte[1024*1024*10];
while (inMappedBuffer.hasRemaining()) {
inMappedBuffer.get(bs);
outMappedBuffer.put(bs);
}
foutChannel.close();
finChannel.close();
Instant endTime = Instant.now();
System.out.println("耗时[ms]:"
+ Duration.between(startTime, endTime).getNano()/10E6);
}
|
通道之间的数据传输:
1
2
| long size1 = fosChannel.transferFrom(fisChannel, 0, fisChannel.size());
long size2 = fisChannel.transferTo(0, fisChannel.size(), fosChannel);
|
分散(scatter)和聚集(gather)
分散读取和聚集写入的概念
- 分散读取(scattering reads):将通道中的数据
按顺序分散到多个缓冲区中
- 聚集写入(gathering writes):将多缓冲区中的数据
按顺序聚集到通道中
分散/聚集 I/O 是使用多个而不是单个缓冲区来保存数据的读写方法。一个分散的读取就像一个常规通道读取,只不过它是将数据读到一个缓冲区数组中而不是读到单个缓冲区中。同样地,一个聚集写入是向缓冲区数组而不是向单个缓冲区写入数据。分散/聚集 I/O 对于将数据流划分为单独的部分很有用,这有助于实现复杂的数据格式。
分散和聚集通道接口
通道可以有选择地实现两个新的接口: ScatteringByteChannel 和 GatheringByteChannel。一个 ScatteringByteChannel 是一个具有两个附加读方法的通道:
- long read( ByteBuffer[] dsts );
- long read( ByteBuffer[] dsts, int offset, int length );
这些read()方法很像标准的read方法,只不过它们不是取单个缓冲区而是取一个缓冲区数组。在分散读取中,通道依次填充每个缓冲区。填满一个缓冲区后,它就开始填充下一个。在某种意义上,缓冲区数组就像一个大缓冲区。
而一个GatheringByteChannel是一个具有两个附加写方法的通道:
- long write( ByteBuffer[] srcs );
- long write( ByteBuffer[] srcs, int offset, int length );
聚集写对于把一组单独的缓冲区中组成单个数据流很有用。为了与上面的消息例子保持一致,您可以使用聚集写入来自动将网络消息的各个部分组装为单个数据流,以便跨越网络传输消息。
分散读取和聚集写入的应用
分散/聚集 I/O 对于将数据划分为几个部分很有用。例如,您可能在编写一个使用消息对象的网络应用程序,每一个消息被划分为固定长度的头部和固定长度的正文。您可以创建一个刚好可以容纳头部的缓冲区和另一个刚好可以容纳正文的缓冲区。当您将它们放入一个数组中并使用分散读取来向它们读入消息时,头部和正文将整齐地划分到这两个缓冲区中。我们从缓冲区所得到的方便性对于缓冲区数组同样有效。因为每一个缓冲区都跟踪自己还可以接受多少数据,所以分散读取会自动找到有空间接受数据的第一个缓冲区。在这个缓冲区填满后,它就会移动到下一个缓冲区。
简单测试:
1
2
3
4
5
6
7
8
9
10
11
12
13
14
15
16
17
18
19
20
21
22
23
24
25
26
27
28
| @Test
public void test03() throws IOException {
RandomAccessFile raf1 = new RandomAccessFile("http-header-body.txt", "rw");
RandomAccessFile raf2 = new RandomAccessFile("http-header-body2.txt", "rw");
FileChannel inChannel = raf1.getChannel();
FileChannel outChannel = raf2.getChannel();
ByteBuffer buffer1 = ByteBuffer.allocate(40);
ByteBuffer buffer2 = ByteBuffer.allocate(100);
ByteBuffer[] buffers = {buffer1, buffer2};
inChannel.read(buffers);
for(ByteBuffer buffer : buffers) {
buffer.flip();
}
System.out.println(new String(buffers[0].array(), 0, buffers[0].limit()));
System.out.println(new String(buffers[1].array(), 0, buffers[1].limit()));
outChannel.write(buffers);
outChannel.close();
inChannel.close();
raf2.close();
raf1.close();
}
|
字符集与编解码
NIO支持的字符集
1
2
3
4
5
6
|
@Test
public void test04() {
SortedMap<String,Charset> charsets = Charset.availableCharsets();
charsets.forEach((k,v) -> System.out.println("k=" + k + ", v=" + v));
}
|
常见的有GBK、UTF-8、UTF-16、ASCII、ISO-8859-1等。
NIO编码和解码简单测试:
1
2
3
4
5
6
7
8
9
10
11
12
13
14
15
16
17
18
| @Test
public void test05() throws IOException {
Charset charset = Charset.forName("GBK");
CharBuffer charBuffer = CharBuffer.allocate(1024);
charBuffer.put("你好,keyllo");
CharsetEncoder encoder = charset.newEncoder();
charBuffer.flip();
ByteBuffer byteBuffer = encoder.encode(charBuffer);
for (int i = 0; i < byteBuffer.limit(); i++) {
System.out.println(byteBuffer.get());
}
CharsetDecoder decoder = charset.newDecoder();
byteBuffer.flip();
CharBuffer charBuffer2 = decoder.decode(byteBuffer);
System.out.println(charBuffer2.toString());
}
|


